传统方案都是通过logstash模版解析nginx日志,现在使用filebeat自带的nginx模块就可以省去logstash。
根据nginx日志配置调整设置
首先要看nginx的配置,如果nginx使用的是默认的日志配置,则忽略这一步。
否则需要根据nginx日志配置来配置filebeat的模版。
比如我们的日志中添加了请求体的记录:
1
2
3
| log_format main '$remote_addr - $remote_user [$time_local] "$request" '
'$status $body_bytes_sent $request_body "$http_referer" '
'"$http_user_agent" $http_x_forwarded_for';
|
先修改template定义,添加request_body字段,对应文件为filebeat.template.json:
1
2
3
4
| "request_body": {
"ignore_above": 1024,
"type": "keyword"
}
|
再到pipeline定义中解析设置, 修改pattern,对应文件为module/nginx/access/ingest/default.json:
1
| "%{IPORHOST:nginx.access.remote_ip} - %{DATA:nginx.access.user_name} \\[%{HTTPDATE:nginx.access.time}\\] \"%{WORD:nginx.access.method} %{DATA:nginx.access.url} HTTP/%{NUMBER:nginx.access.http_version}\" %{NUMBER:nginx.access.response_code} %{NUMBER:nginx.access.body_sent.bytes} %{DATA:nginx.access.request_body} \"%{DATA:nginx.access.referrer}\" \"%{DATA:nginx.access.agent}\" %{DATA:nginx.access.forwarded}"
|
启动
首先需要在ES添加两个插件:
1
2
| bin/elasticsearch-plugin install ingest-user-agent
bin/elasticsearch-plugin install ingest-user-agent
|
编辑filebeat.yml:
- 添加默认的prospector,配置log的路径
- 修改output.elasticsearch的地址,端口,密码等
启动客户端,加载nginx模块:
1
| nohup ./filebeat -e -modules=nginx -M "nginx.access.var.paths=[/data/logs/access*]" -M "nginx.error.var.paths=[/data/logs/error.log]" >/dev/null 2>&1 &
|
调整nginx日志配置后的变更
Ingest
删除已经创建的pipeline
1
2
3
| GET _ingest/pipeline
DELETE _ingest/pipeline/filebeat-5.4.1-nginx-access-default
|
Index templates
因为默认不会覆盖已有的templates,所以要删除已经创建的templates:
1
2
| GET /_template/
DELETE /_template/filebeat
|
或者在配置文件中将overwrite设为true:
1
2
| output.elasticsearch:
template.overwrite: true
|
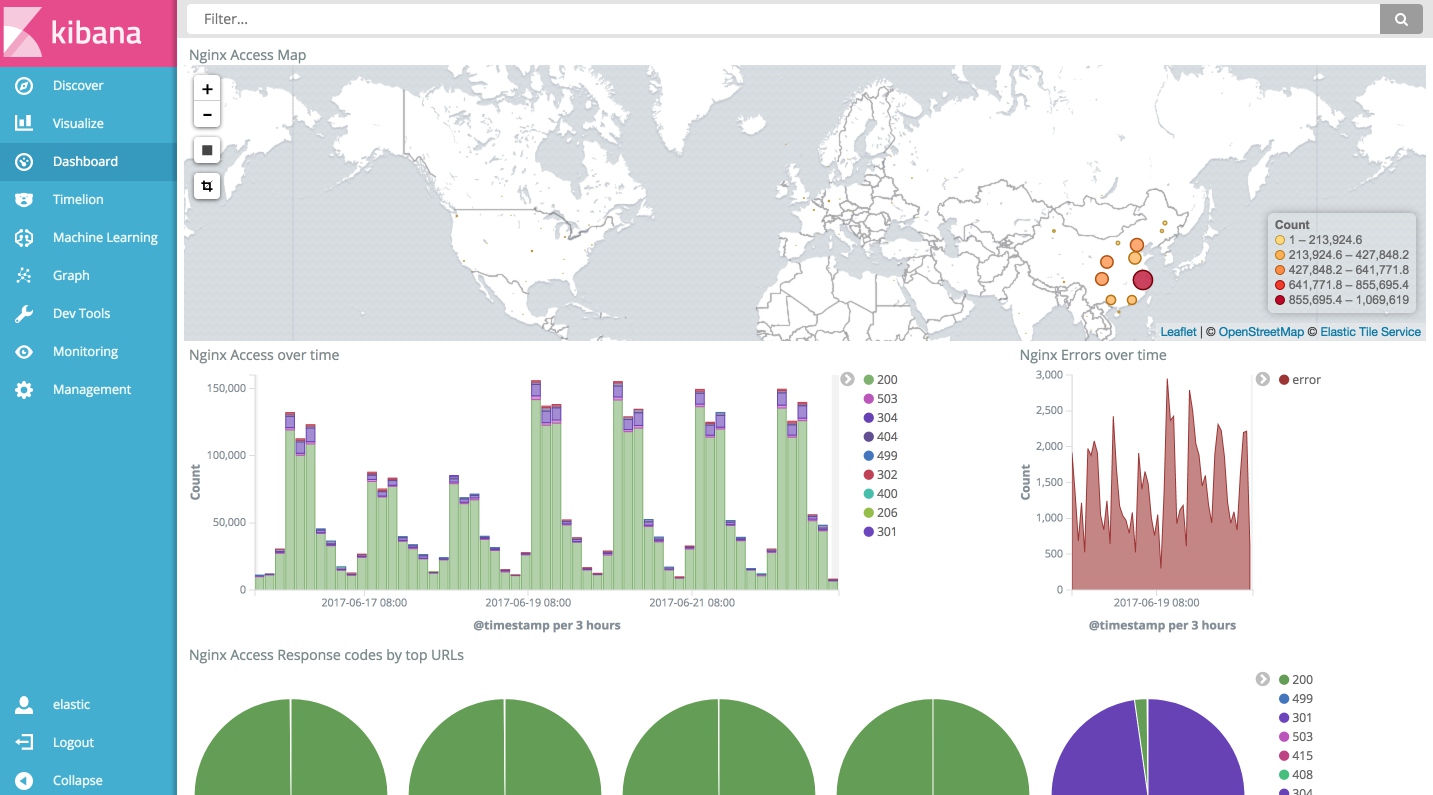
kibana查看图表
创建完成之后dashboard中会创建默认的几个面板。
Filebeat Nginx Dashboard:
追踪日志排查问题
客户端有个积压已久的问题:
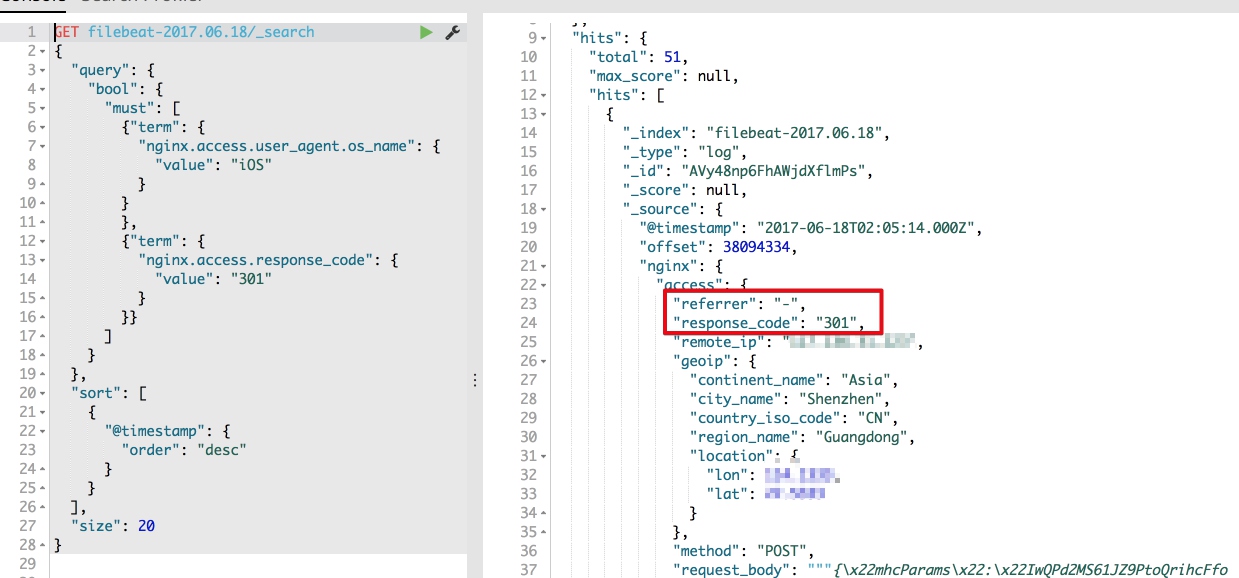
 应用没有看到相关日志,怀疑nginx层返回跳转指令,排查30X响应头:
 1
 2
 3
 4
 5
 6
 7
 8
 9
10
11
12
13
14
15
16
17
18
19
20
21
22
23
24
25
26
27
28
| GET filebeat-2017.06.18/_search
{
"query": {
"bool": {
"must": [
{"term": {
"nginx.access.user_agent.os_name": {
"value": "iOS"
}
}
},
{"term": {
"nginx.access.response_code": {
"value": "301"
}
}}
]
}
},
"sort": [
{
"@timestamp": {
"order": "desc"
}
}
],
"size": 20
}
|
定位到是因为响应头为301却没有返回跳转地址:
 通过flask模拟:
 1
 2
 3
 4
 5
 6
 7
 8
 9
10
11
12
13
| import os
from flask import Flask,redirect
app = Flask(__name__)
@app.route('/', methods=['GET', 'POST'])
def hello():
return redirect("", code=301)
if __name__ == '__main__':
# Bind to PORT if defined, otherwise default to 5000.
port = int(os.environ.get('PORT', 5000))
app.run(host='0.0.0.0', port=port)
|
成功在客户端复现,通过客户端逻辑调整修复了这个困扰已久的问题。